Changelog
We ship product updates weekly. Follow us on 𝕏 for the latest.
Bucket MCP (Beta)
·
·
We’re constantly striving to make feature flagging as frictionless as possible. To that end, we’ve just released the Bucket MCP in beta.
Model Context Protocol (MCP) lets an LLM interact with external data, in this case the Bucket API.
So with Bucket MCP you can flag features directly from the chat window in your code editor. Whether that’s VS Code, Cursor, Windsurf, Claude—any IDE that has MCP support.
For example, if you’ve built a “Download CSV” feature and want to flag it, you no longer have to go to bucket.co or use the CLI to create a feature key.
Instead, ask the MCP to do it for you: “flag the download button with bucket.”
The Bucket MCP will then create a feature key on bucket.co with a relevant name and provide the context needed so your IDE's LLM will flag the feature in the codebase.
Here’s what it looks like in action:
As shown in the video, you can also use Bucket MCP to grant company segments and individual companies or users access to the feature—straight from the chat window.
To give “Acme” access, for example, you’d ask something like: “give Acme access to the download csv feature” and Bucket will look up the company name and enable the Download CSV feature for it.
To get started, add the Bucket MCP in your IDE. Here are instructions on how to do that.
Happy prompting!
Automated stale flag clean up
·
·
One of the most annoying things about feature flags is the maintenance work of cleaning them up when you’re done with them.
The code cleanup changes are mostly straightforward, but the task management, the context switching, waiting for tests to complete and code review all makes it a frustrating chore. Especially when you’re itching to get started on the next sweet feature.
Because of the maintenance frustration, most teams don’t clean up flags consistently. Which means you end up carrying around a bunch of useless code that is no longer being used that adds friction and frustrating errors when working on the code base.
Cleaning up feature flags takes time and focus away from building what matters, but avoiding cleaning them up is problematic, too. So we built Bucketbot.
Bucketbot
Bucketbot is a bot for GitHub that automatically cleans up feature flags once features have been rolled out.
After roll out, you can trigger Bucketbot to clean up the feature flag. Bucketbot will look through your code and submit a pull request to your repository on GitHub, cleaning up the flag and removing any code that is no longer needed.

It’s currently in Early Access. Sign up if you want to be included.
Happy zero-maintenance flagging!
Improved Event log
·
·
The Event log shows the data your application sends to help you see if everything is set up correctly, and we’ve just made it more powerful.
The updated event log shows all events collected – evaluate, check, user, company and track – and lets you filter by any of them.
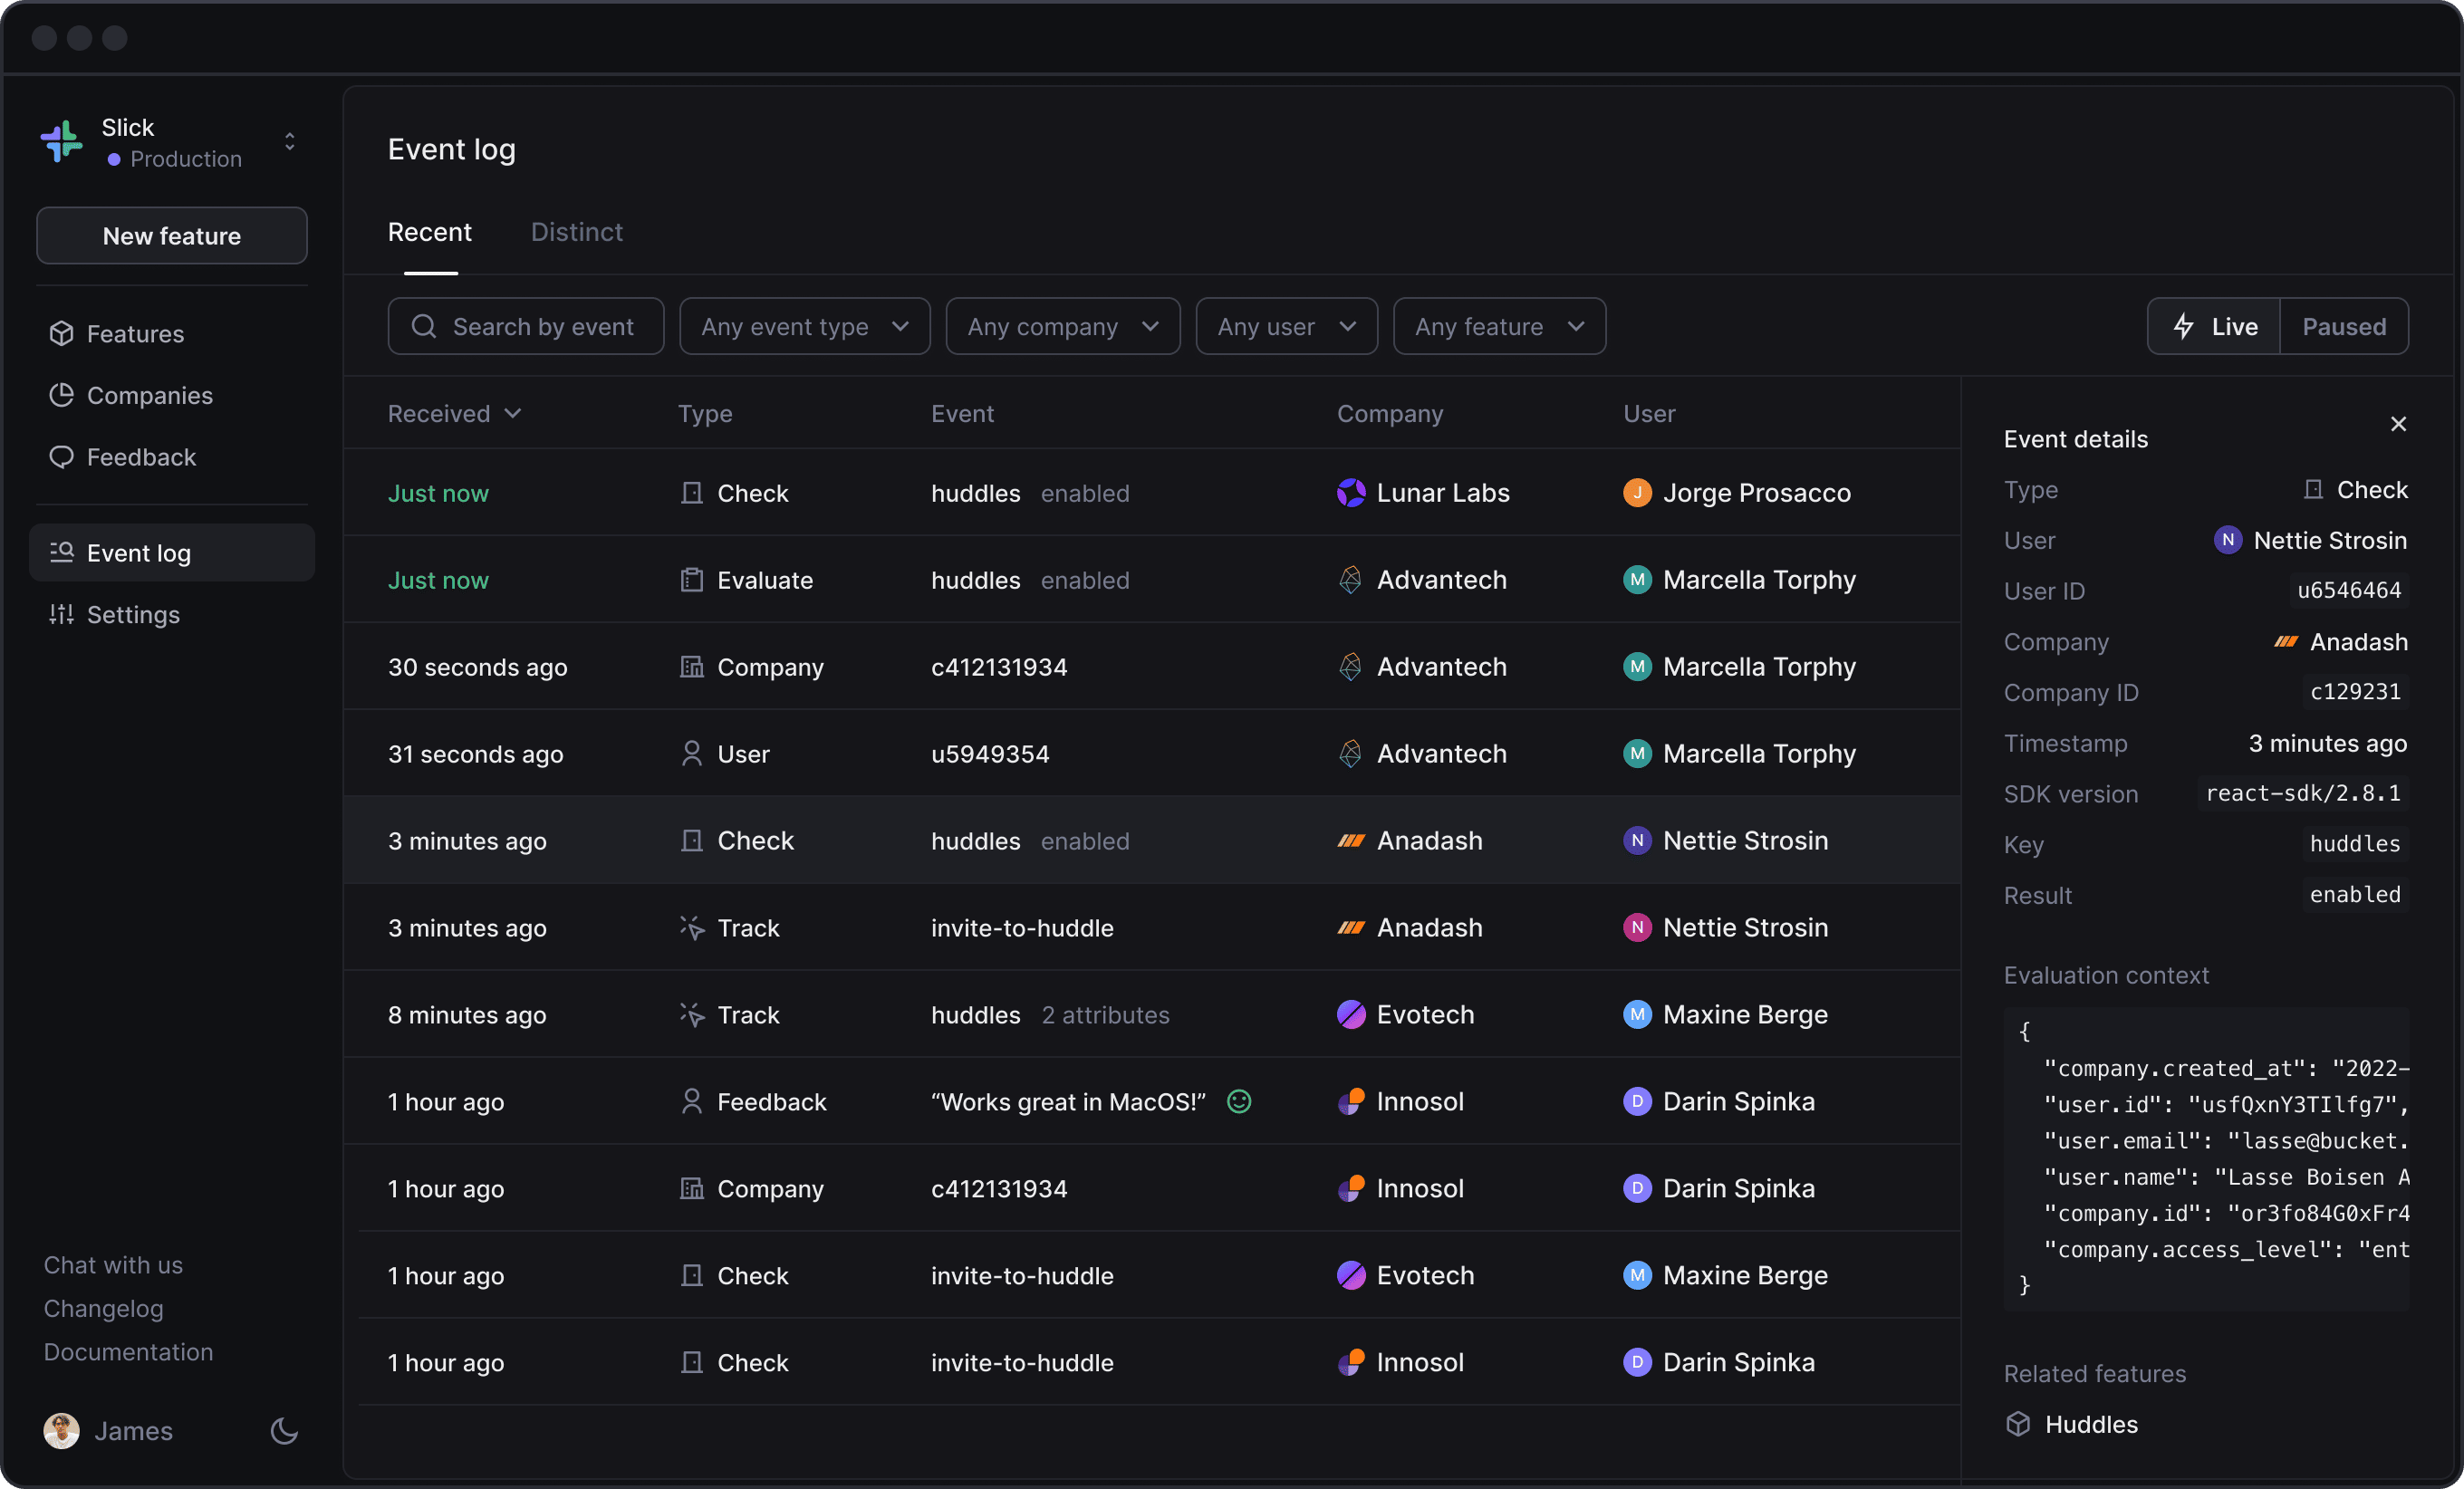
Here’s a quick recap of what the various event types are for:
- Evaluate: this denotes that a feature’s access rules were evaluated against a user/company context.
- Check: your application code used the result of this evaluation to make a choice of enabling or disabling the feature for a user.
- User: a user has been created or updated.
- Company: a company has been created or updated.
- Track: a user has interacted with a feature.
Event details
Clicking on an event will open the sidebar which shows more details about the event.
For evaluate and check events, the sidebar shows the context that was used in the evaluation to determine whether or not the user should have access to the feature. If any context is missing to perform the evaluation, the Event log will highlight it.
For all events, you’ll also see which SDK client version was used to send the event.
Happy debugging!
Toolbar
·
·
We’ve shipped the Bucket toolbar. As a developer or product manager, it’s useful to toggle features on and off for yourself when testing your own (or team members) features.

The toolbar is built into our browser SDKs and will automatically appear when you visit “localhost” if the Bucket Browser SDK or Bucket React SDK is installed in the website.
For many, it makes sense to enable it in production for internal use. Setting “toolbar” to true will make the toolbar appear:
function App() {
  const user = useAuth();

  return (
    <BucketProvider toolbar={user?.isAdmin}>
      <Routes>
    </BucketProvider>
  )
}
Happy shipping!
CLI & Type Safety
·
·
We have shipped a command line interface (CLI) that you can use to interact with Bucket. The CLI removes any friction in creating features from the command line and helps you maintain type safety for your features:
› npm i @bucketco/cli --save-dev
› bucket new "My Feature"
When creating a new feature, the CLI will automatically update your local types to make sure they match those defined in Bucket, saving you from making frustrating typos referencing your feature keys.
The CLI will also generate types for Remote Config based on the payloads configured in Bucket. This helps ensure that the shape of the payload you’ve configured in Bucket matches what you’re working with in the code.
function MyFeature() {

  // The feature key argument passed to the useFeature hook is strongly
  // typed and will give a compile-time error if the key does not exist.
  const { isEnabled, config } = useFeature("my-feature");

  if (!isEnabled) return null;

  // Given the following payload configured in Bucket:
  // {
  //   fontWeight: "bold",
  //   copy: "Sync now!"
  // }
  //
  // The CLI will generate the type:
  // {
  //   fontWeight: string;
  //   copy: string;
  // }
  //
  // Which will give a compile-time error when we refer to
  // the missing "fontBold" property below.
  return (
    <button style={{fontWeight: config.payload.fontBold}}>
      {config.payload.copy}
    </button>
  )
}
Happy shipping!
Add in bulk
·
·
Sometimes you need to give a bunch of people access to features at once. Maybe you are migrating to Bucket from another feature flagging provider and need to transfer a list of beta users. Or someone from Customer Success hands you a CSV file with people who’ve opted into your beta program through email.
Now you just hit “Add in bulk” and paste in your list of IDs.

Note: “Add in bulk” is available to customers on the Pro and Enterprise plans.
Event listeners for lightweight integrations
·
·
We’ve made it possible to easily integrate Bucket with other systems through event listeners in the Bucket SDKs. Event listeners are useful for debugging and logging, but they really shine when you want to make Bucket data available in other systems.
For example, when debugging sessions in Datadog Session Replay, it’s useful to know which feature flags were enabled for the user. Sending feature flag checks to Datadog now only takes a few lines of code in the Bucket React SDK:
import { datadogRum } from "@datadog/browser-rum";
import { useClient } from "@bucketco/react-sdk";

function DatadogFlagEvalIntegration() {
  const client = useClient();
  useEffect(() => {
    return client?.on("check", (check) => {
      datadogRum.addFeatureFlagEvaluation(check.key, check.value);
    });
  }, [client]);
  return null;
}
Similarly, If you’re using Bucket track() to monitor feature usage, you can now send these events to Amplitude easily:
import { amplitude } from "@amplitude/analytics-node";
import { useClient } from "@bucketco/react-sdk";

function AmplitudeTrackIntegration() {
  const client = useClient();
  useEffect(() => {
    return client?.on("track", (trackEvent) => {
      amplitude.track(trackEvent.eventName);
    });
  }, [client]);
  return null;
}
See the full documentation for more information
Remote Config is available in Beta
·
·
We’ve just added remote feature configuration to Bucket. A dynamic, flexible approach to configuring feature behavior outside of your app – without needing to re-deploy it.
For example, you can use configs to configure AI models for your customers at runtime. With remote config, you can safely upgrade customers to the latest AI model or you can try different models for different segments of customers. If a new model is causing quality issues, you can easily roll back to a previous version.
You can also use configs to manage things like in-app copy. This means non-engineers can update the application on their own without touching the codebase.
How it works
Let’s say you’re using GPT-4o in your application and want the option to easily upgrade all or some customers to the latest version as soon as it arrives. Furthermore, you want to be able to give certain customers access to a competing model, Claude 3.7, to see if it outperforms GPT-4o.
Remote Config is based on JSON and is therefore highly flexible. You can decide which JSON payload to send to your application.
Here’s an AI configuration example:

All customers get gpt-4o from OpenAI as default except the two customers – Apex and Blaze – which get claude-3-7-sonnet from Anthropic.
When gpt-4o gets upgraded to the next version by OpenAI, you can simply go here to update the payload, or you can add a new, small beta segment to test the new OpenAI version, like so:

How to get started
To get started with Remote Config, you need to first upgrade to the latest version of our SDKs.
In the React SDK you can now use config when using useFeature:
const { config } = useFeature("sent-chat-message");
As per our example in the screenshot above, if you’re authenticated as Adrian Borer or any user in the Logix or Hightrix companies, you’ll get this config:
.webp)
Get user feedback on models
If you want to get user feedback on the models, you use Bucket’s requestFeedback, like so:
.webp)
All feedback will be sent to the Feedback tab, right next to Remote Config, as well as to Slack, if you choose to.
To learn more about Remote Config, check out our documentation.
Happy shipping!
Custom feature key naming convention
·
·
By default, when you create a new feature on Bucket, we'll suggest a feature key derived from the name. The format of the key is kebab-case by default. However, you may prefer to use a different naming convention. In some cases, it's just that you're used to SNAKE_UPPER_CASE from previous feature flagging providers. In other cases, a specific format might work better for the programming language of your choice.
Now you can define your feature key naming convention when creating a new feature. You can always customize the name of the key, but when picking a naming convention, Bucket will then enforce that new keys adhere to it.

Secret features
·
·
When you create a feature today, the feature becomes available for use in your browser application through Bucket SDKs. That means the feature is retrievable through our public facing API using a publishable key. For most features, this is desirable because it lets you toggle features in your app UI. It also lets you build integrations right in your app.
However, once in a while you're working on something you need to keep secret from everyone. For this use-case, we've made it possible to mark features as secret on Bucket. Secret features are not retrievable with a publishable key — only with a secret key. That means you can use a feature on your backend and ensure that the feature key is never revealed to any users.
